指定几何属性
几何属性是指孔和流道的物理尺寸,例如孔径和流道长度。这些值对于网络建模至关重要,因为它们控制着网络的所有传输和渗透行为。与可以归一化的相属性不同,几何属性比连通性等拓扑属性更能定义网络。
几何属性可以通过各种方法计算,为孔隙分配随机值,从断层扫描图像中提取值等等。OpenPNM提供了一个函数库,或“孔隙尺度模型”,可以自动计算这些几何属性。本教程将涵盖以下主题:
- 手动计算孔和流道的几何属性(不推荐,太麻烦)
- 使用库中的孔隙尺度模型(推荐)
-
依赖项处理程序概述
先创建一个简单的网络模型(只包含孔和流道的位置、数量信息,不包含几何参数)
import numpy as np
import matplotlib.pyplot as plt
import openpnm as op
op.visualization.set_mpl_style()
np.random.seed(0)
pn = op.network.Cubic([20, 20, 20], spacing=5e-5)
print(pn)
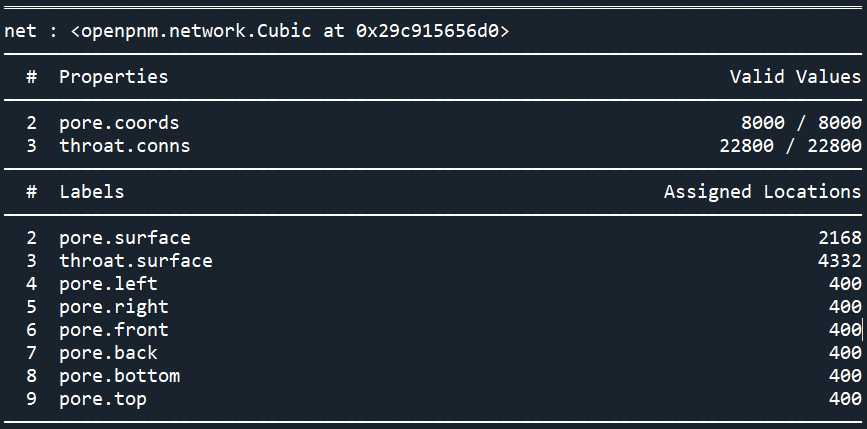
想要为网络模型添加几何参数可以通过下面几种方式:
手动计算几何属性
注意,手动计算非常麻烦,但是能很好的说明了计算过程,不推荐在编码过程中采用手动计算
让我们从添加孔和流道直径分布开始。有几种不同的方法可以做到这一点,我们将探索每种方法。
从分布中添加孔流道直径
scipy.stats模块定义了许多统计学分布,首先,让我们使用正态分布来生成1到50 um范围内的孔径
np.random.seed(0)
import scipy.stats as spst
psd = spst.norm.rvs(loc=25, scale=6, size=pn.Np)
plt.hist(psd, edgecolor='k')
plt.xlim([0, 50]);
Definition : rvs(*args, **kwds)
Random variates of given type.Parameters
arg1, arg2, arg3,...array_like
The shape parameter(s) for the distribution (see docstring of the instance object for more information).loc:array_like, optional
Location parameter (default=0).scale:array_like, optional
Scale parameter (default=1).size:int or tuple of ints, optional
Defining number of random variates (default is 1).random_state:{None, int, numpy.random.Generator,
numpy.random.RandomState}, optionalIf seed is None (or np.random), the numpy.random.RandomState singleton is used. If seed is an int, a new RandomState instance is used, seeded with seed. If seed is already a Generator or RandomState instance then that instance is used.
Returns
rvsndarray or scalar
Random variates of given size.plt.hist()相关说明可以参考:https://matplotlib.org/stable/api/_as_gen/matplotlib.pyplot.hist.html
和https://blog.csdn.net/weixin_45520028/article/details/113924866
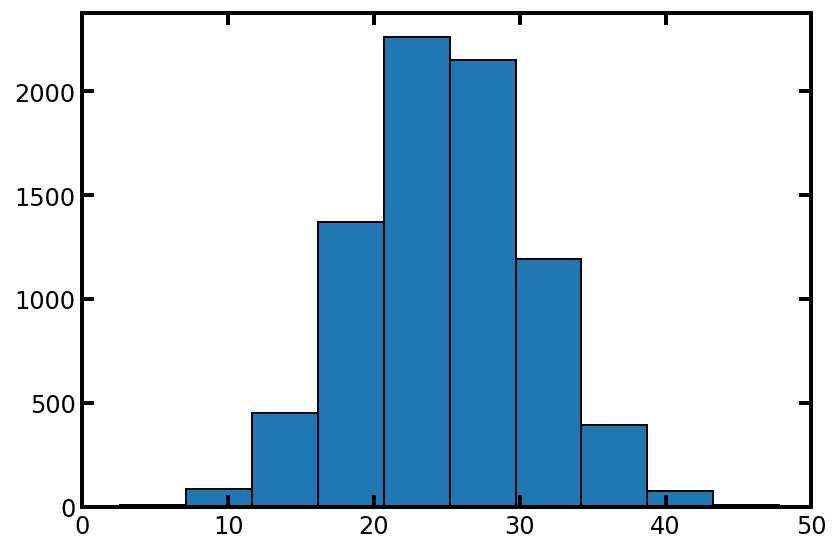
#上面的分布看起来不错,但是要确保我们的分布不是太宽,以至于它的值大于 50 um:

print(psd.min())
print(psd.max())
'''
2.5593961722893255
47.80996128980269
'''
#现在,我们将这些值转换单位并分配给网络:

pn['pore.diameter'] = psd*1e-6  # um to m
接下来定义流道直径。我们可以用同样的方式做到这一点,但使用不同统计学分布。请注意,不建议使用此方法,因为正如我们将看到的,它会导致流道直径大于它们连接两个的两个孔。我们将在后面解决此问题:
np.random.seed(0)
tsd = spst.weibull_min.rvs(c=1.5, loc=.5, scale=7.5, size=pn.Nt)
plt.hist(tsd, edgecolor='k')
plt.xlim([0, 50]);
spst.weibull_min.rvs()函数的相关信息可以参考:https://docs.scipy.org/doc/scipy/reference/generated/scipy.stats.weibull_min.html
和https://blog.csdn.net/weixin_41102672/article/details/106565711
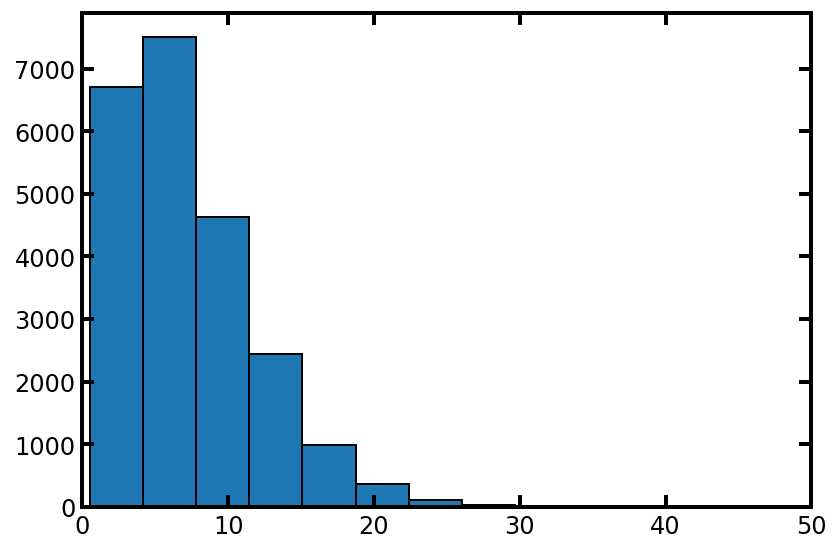
#同样,让我们检查高值和低值:

print(tsd.min())
print(tsd.max())
'''
0.5130345457395142
36.96861960231873
'''
#所以我们可以看到我们的流道直径小到500纳米,大到37微米。这些也可以分配给网络:

pn['throat.diameter'] = tsd*1e-6  # um to m
这种方法的问题在于,孔和流道直径的大小只是分配给随机位置,而不是将小流道放在小孔之间,反之亦然。当流道直径大于它们连接的孔时,可能会导致结果出现问题,因为我们通常认为流道直径比两个孔之都小。可以通过下面的代码数一数有多少是有问题的
hits = np.any(pn['pore.diameter'][pn.conns].T < pn['throat.diameter'], axis=0)
hits.sum()
'''
564
'''
数组后加 .T 意思是矩阵转置
通过conns索引孔隙属性:使用数组索引孔隙属性将返回一个Nt-by-2数组,其中包含每个列中流道末端的孔隙属性。例如,看看流道两端孔的直径。connspn['pore.diameter'][pn.conns]
np.any()函数的相关信息可以参考:https://numpy.org/doc/stable/reference/generated/numpy.any.html
有两种更好的方法来分配孔和流道的直径,以确保流道直径小于它们连接的孔径。第一种是通过随机分配孔径进行上述操作,然后将流道分配为与其连接的最小孔一样小(或更小)。这可以使用一些函数来完成,如下所示:numpy
tsd = np.amin(pn['pore.diameter'][pn.conns], axis=1)
plt.hist(tsd, edgecolor='k', density=True, alpha=0.5)#alpha设置透明度,0为完全透明
plt.hist(pn['pore.diameter'], edgecolor='k', density=True, alpha=0.5)
plt.xlim([0, 50e-6]);
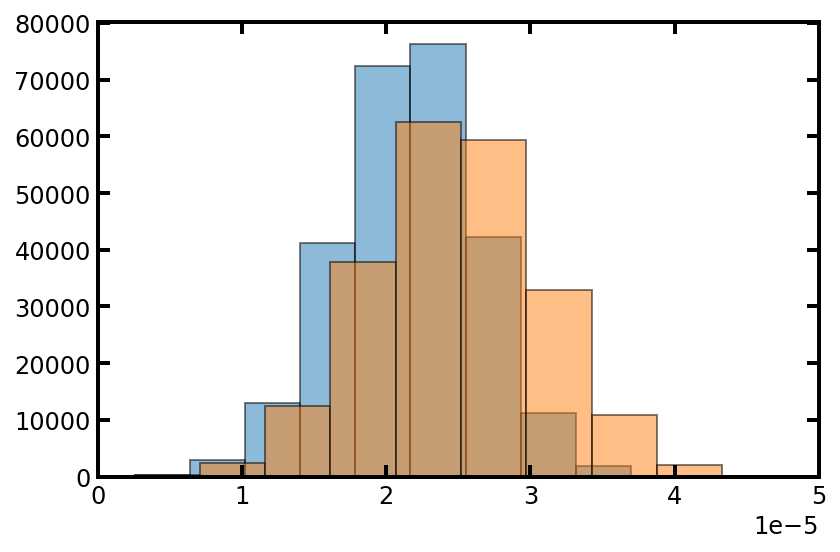
从上图中我们可以看到,流道直径大小与孔径相似,但是偏小一点这是意料之中的,因为它们取自孔径值,而且流道直径要比孔径小。
还需要通过某种因素迫使喉咙小于相邻的两个毛孔:
pn['throat.diameter'] = tsd*0.5
plt.hist(pn['throat.diameter'], edgecolor='k', density=True, alpha=0.5)
plt.hist(pn['pore.diameter'], edgecolor='k', density=True, alpha=0.5)
plt.xlim([0, 50e-6]);
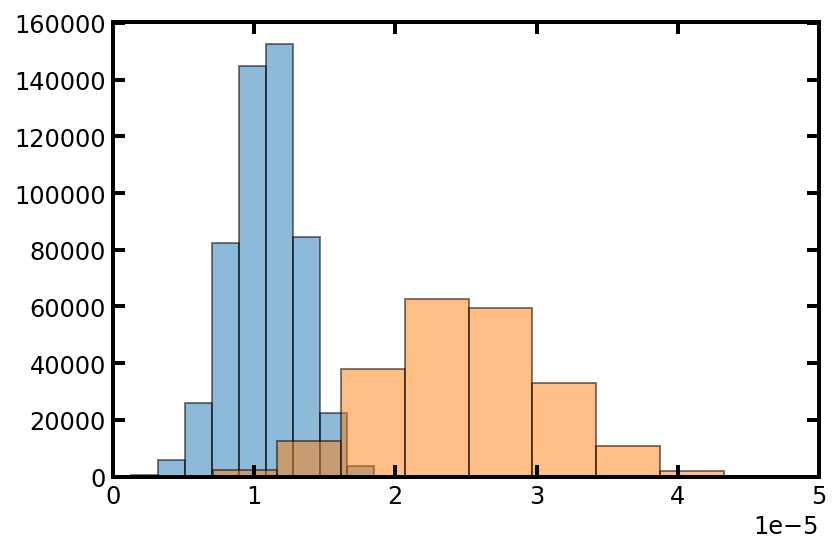
上述方法的一个缺点是无法再控制流道直径大小的分布。这可以通过应用于随机种子来解决。将随机种子放入累积密度函数中以计算相应的直径大小。如下所示:
随机种子的相关解释可以参考:https://blog.csdn.net/ding_programmer/article/details/95097924
https://en.wikipedia.org/wiki/Random_seed
https://www.geeksforgeeks.org/random-seed-in-python/
lo, hi = 0.01, 0.99
pn['pore.seed'] = np.random.rand(pn.Np)*(hi - lo) + lo
#设置种子的和值可以防止位于分布尾部较远的值出现,从而导致过大的孔径或喉道直径

#使用点概率函数返回给定概率下的累积分布值,因此上面计算的种子值可以使用以下代码与大小值相关联
import scipy.stats as spst
psd = spst.norm.ppf(loc=25, scale=6, q=pn['pore.seed'])
pn['pore.diameter'] = psd*1e-6
plt.hist(pn['pore.diameter'], edgecolor='k')
plt.xlim([0, 50e-6]);
Definition : ppf(q, *args, **kwds)
Percent point function (inverse of cdf) at q of the given RV.Parameters
q:array_like
lower tail probabilityarg1, arg2, arg3,...array_like
The shape parameter(s) for the distribution (see docstring of the instance object for more information)loc:array_like, optional
location parameter (default=0)scale:array_like, optional
scale parameter (default=1)Returns
x:array_like
quantile corresponding to the lower tail probability q.
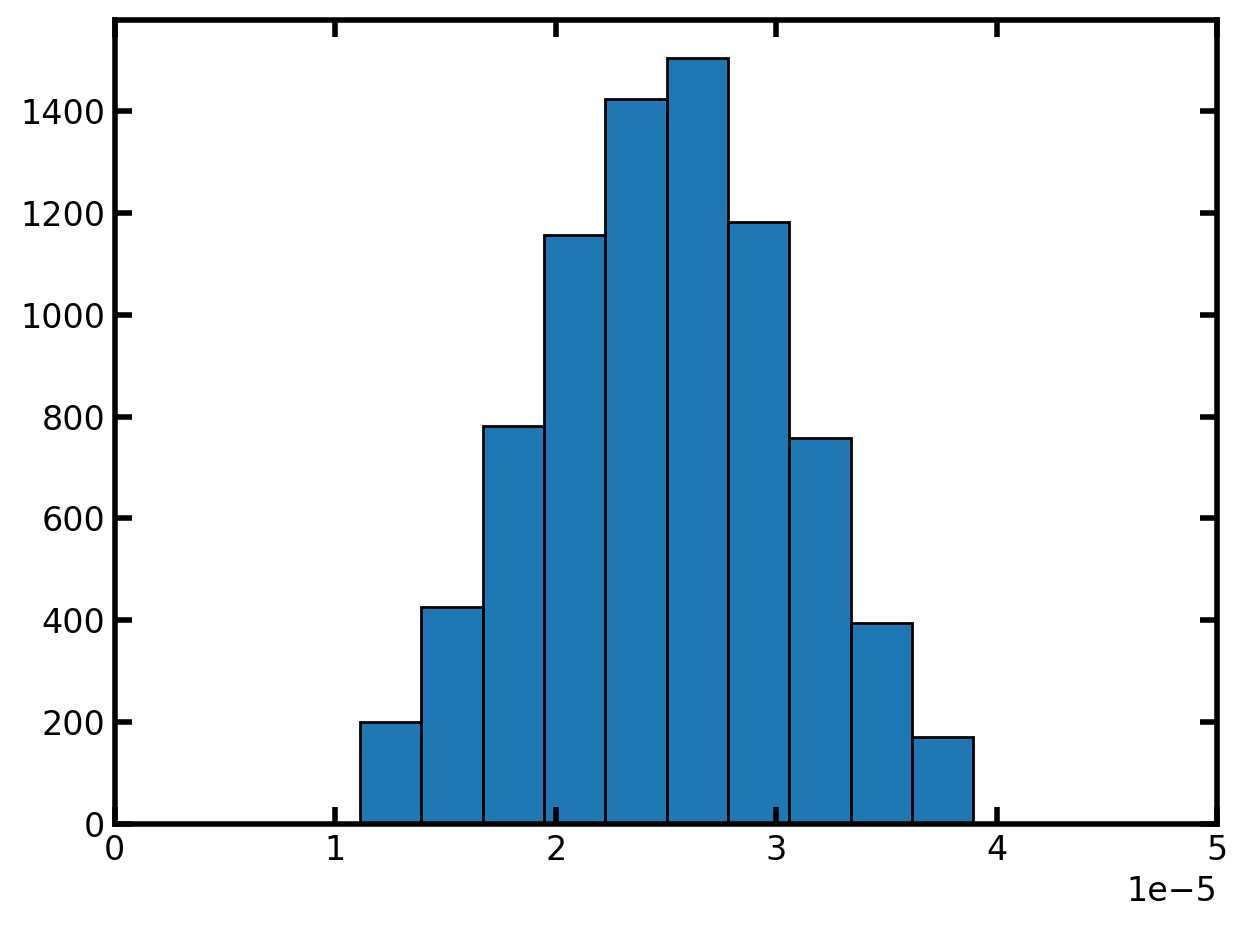
流道种子值为两个相邻孔隙的最小孔隙种子值:
pn['throat.seed'] = np.amin(pn['pore.seed'][pn.conns], axis=1)
同样,可以根据流道的种子算出流道的直径大小:
tsd = spst.norm.ppf(loc=25, scale=6, q=pn['throat.seed'])
pn['throat.diameter'] = tsd*1e-6
plt.hist(pn['throat.diameter'], edgecolor='k', density=True, alpha=0.5)
plt.hist(pn['pore.diameter'], edgecolor='k', density=True, alpha=0.5)
plt.xlim([0, 50e-6]);
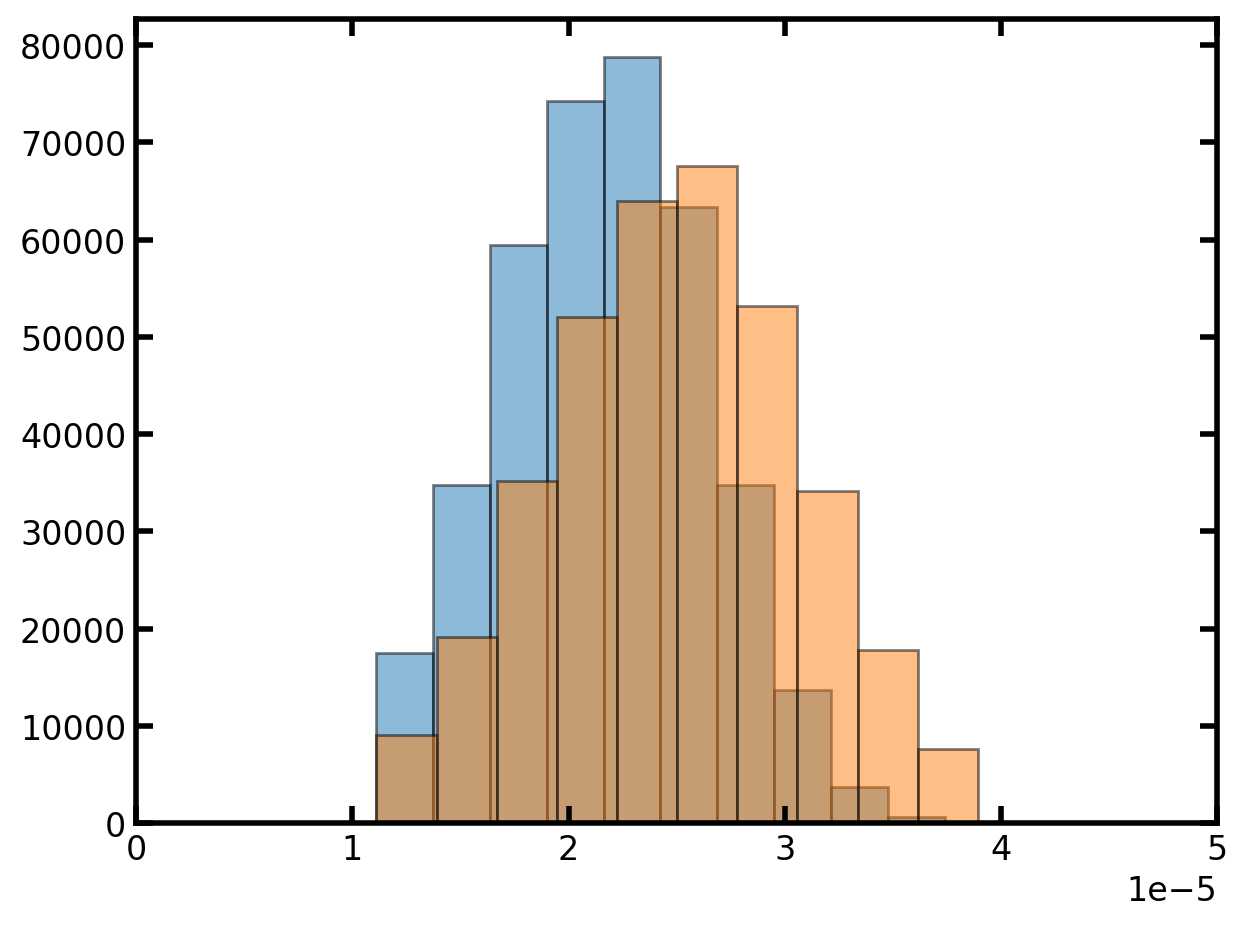
指定孔径和流道直径后,下一步是定义任何相关属性,例如孔体积或流道长度。这些额外的计算往往要求我们假设孔和流道的形状。通常是球棍模型。但是我们还可以使用立方体孔和长方体喉咙。出于探讨的原因,立方体形状的选择也恰好使计算变得更加容易,因此在本教程中,我们将假设立方体形状。让我们计算流道长度和孔表面积,因为它们中的每一个都说明了有关使用矢量化计算的重要概念。
计算流道长度
流道长是孔间间距,减去每个孔的半径。可以使用以下矢量化技巧在不需要 for 循环的情况下找到这一点
R1, R2 = (pn['pore.diameter'][pn.conns]/2).T
L_total = np.sqrt(np.sum(np.diff(pn.coords[pn.conns], axis=1).squeeze()**2, axis=1))
'''
np.diff():Calculate the n-th discrete difference along the given axis.
np.sum():Sum of array elements over a given axis.
numpy.squeeze() function is used when we want to remove single-dimensional entries from the shape of an array.
'''
Lt = L_total - R1 - R2
print(L_total)
上述单元格包含3个复杂但强大的步骤:
每个流道两端的孔半径被检索出来。因为每个孔都有很多流道,所以每个流道要一次孔半径。这在第3步中使用。R1R2
孔到孔的距离是通过检索每个孔的坐标来找到的,与计算半径的方法相同。然后计算每对孔隙之间的欧几里得距离,方法是找到它们的差值,对其求和,然后取平方根。
每个流道的长度是用孔之间的间距减去两个孔半径
这里的主要信息是流道属性可以用矢量化的方式计算,即使需要一些孔隙属性。
计算孔隙表面积
孔表面积是立方孔体的总面积,减去每个相邻流道的横截面积。这也可以在没有 for 循环的情况下找到,但需要了解一些更深层次的功能,
At = pn['throat.diameter']**2
SAp = (pn['pore.diameter']**2)*6
np.subtract.at(SAp, pn.conns[:, 0], At)
np.subtract.at(SAp, pn.conns[:, 1], At)
print(SAp)
'''
[[   0    1]
 [   1    2]
 [   2    3]
 ...
 [7597 7997]
 [7598 7998]
 [7599 7999]]
[7.27174552e-09 3.85799662e-09 4.84581355e-09 ... 2.94168620e-09
 2.75016941e-09 3.47031746e-09]
'''
上面的单元格包含2行重要性,每一行几乎都做同样的事情:
1、从数组的第一列中列出的每个孔中减去喉道横截面积。由于一个给定的孔隙与潜在的许多喉道相连,因此必须使用减法函数的特殊版本来完成减法函数,该函数从所指示的位置中减去每一个值,并且以累积的方式这样做。因此,如果孔隙i出现了不止一次,则删除的值就不止一个。该操作在原地执行,因此不会返回任何数组
2、从数组的第二列中列出的每个孔中减去喉道横截面积
使用OpenPNM自带的pore-scale模型
在本节中,我们将利用OpenPNM的“孔隙尺度”模型库来更轻松地完成相同的工作。首先生成一个新网络:
np.random.seed(0)
pn = op.network.Cubic([20, 20, 20], spacing=5e-5)

#为每个孔分配一个随机数,使用孔隙尺度模型:np.random.rand

f = op.models.geometry.pore_seed.random
pn.add_model(propname='pore.seed',
             model=f,
             seed=None,  # Seed value provided to numpy's random number generator.
             num_range=[0.01, 0.99],)

#让我们让每个流道继承其每个相邻毛孔中的最小种子值,OpenPNM 为此提供了一个模型:
f = op.models.geometry.throat_seed.from_neighbor_pores
pn.add_model(propname='throat.seed',
             model=f,
             prop='pore.seed',
             mode='min')
"""
add_model(propname, model, domain='all', regen_mode='normal', *, map: Mapping[_KT, _VT], iterable: Iterable[Tuple[_KT, _VT]], **kwargs: _VT)

        Add a pore-scale model to the object, along with the desired arguments

        Parameters
        ----------
        propname : str
            The name of the property being computed. E.g. if
            ``propname='pore.diameter'`` then the computed results will be stored
            in ``obj['pore.diameter']``.
        model : function handle
            The function that produces the values
        domain : str
            The label indicating the locations in which results generated by
            ``model`` should be stored. See `Notes` for more details.
        regen_mode : str
            How the model should be regenerated. Options are:

            ============ =====================================================
            regen_mode   description
            ============ =====================================================
            normal       (default) The model is run immediately upon being
                         added, and is also run each time ``regenerate_models``
                         is called.
            deferred     The model is NOT run when added, but is run each time
                         ``regenerate_models`` is called. This is useful for
                         models that depend on other data that may not exist
                         yet.
            constant     The model is run immediately upon being added, but is
                         is not run when ``regenerate_models`` is called,
                         effectively turning the property into a constant.
            ============ =====================================================

        kwargs : keyword arguments
            All additional keyword arguments are passed on to the model

        Notes
        -----
        The ``domain`` argument dictates where the results of ``model`` should
        be stored. For instance, given ``propname='pore.diameter'`` and
        ``domain='left'`` then when `model` is run, the results are stored in
        in the pores labelled left. Note that if ``model`` returns ``Np``
        values, then values not belonging to ``'pore.left'`` are discarded.
        The following steps outline the process:

        1. Find the pore indices:

        .. code-block:: python

          Ps = obj.pores('left')

        2. Run the model:

        .. code-block:: python

          vals = model(**kwargs)

        3. If the model returns a full Np-length array, then extract the
        correct values and apply them to the corresponding locations:

        .. code-block:: python

          if len(vals) == obj.Np:
              obj['pore.diameter'][Ps] = vals[Ps]

        4. If the model was designed to return only the subset of values then:

        .. code-block:: python

          if len(vals) == obj.num_pores('left'):
              obj['pore.diameter'][Ps] = vals

"""
现在我们可以从分布中计算孔和喉部大小,这些分布也以 OpenPNM 模型的形式提供:
f = op.models.geometry.pore_size.normal
pn.add_model(propname='pore.diameter',
             model=f,
             scale=1e-5,
             loc=2.5e-5,
             seeds='pore.seed')
plt.hist(pn['pore.diameter'], edgecolor='k');
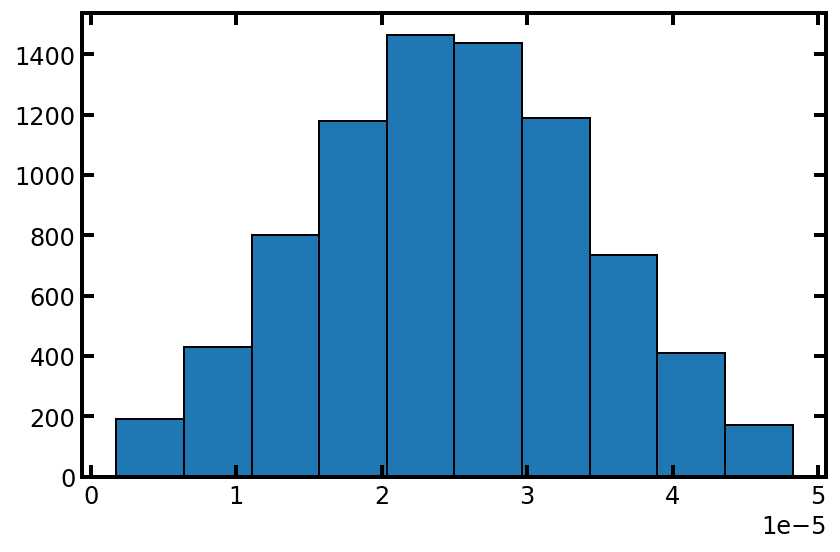
类似地,我们也获取流道大小的模型:
f = op.models.geometry.throat_size.normal
pn.add_model(propname='throat.diameter',
             model=f,
             scale=1e-5,
             loc=2.5e-5)
plt.hist(pn['pore.diameter'], edgecolor='k', density=True, alpha=0.5)
plt.hist(pn['throat.diameter'], edgecolor='k', density=True, alpha=0.5);
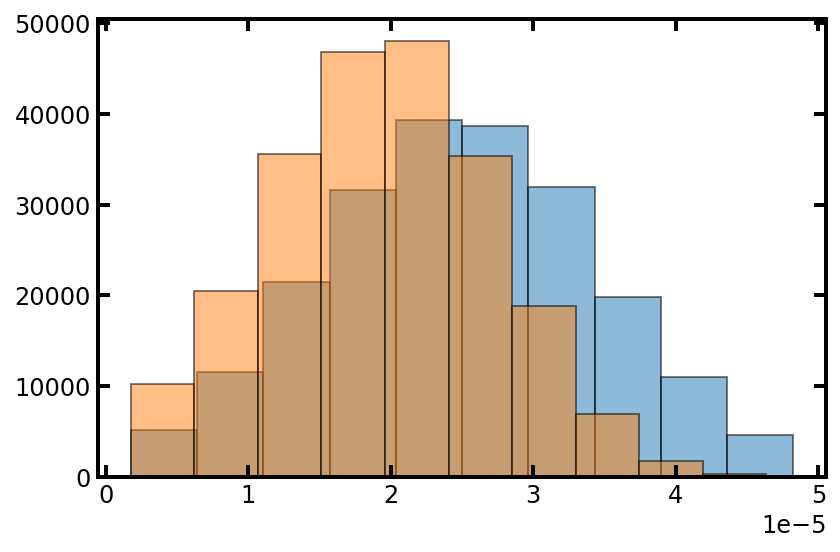
现在我们有了孔和流道的直径的大小,我们可以计算它们的体积(和其他属性)
f = op.models.geometry.throat_length.spheres_and_cylinders
pn.add_model(propname='throat.length',
             model=f)
f1 = op.models.geometry.pore_volume.sphere
pn.add_model(propname='pore.volume',
             model=f1)
f2 = op.models.geometry.throat_volume.cylinder
pn.add_model(propname='throat.volume',
             model=f2)

#球形孔与其连接的流道之间存在重叠区域。需要额外的步骤来消除:
f = op.models.geometry.throat_length.spheres_and_cylinders
pn.add_model(propname='throat.length',
             model=f)
f1 = op.models.geometry.pore_volume.sphere
pn.add_model(propname='pore.volume',
             model=f1)
f2 = op.models.geometry.throat_volume.cylinder
pn.add_model(propname='throat.total_volume',
             model=f2)
f3 = op.models.geometry.throat_volume.lens
pn.add_model(propname='throat.lens_volume',
             model=f3)
f4 = op.models.misc.difference
pn.add_model(propname='throat.volume',
             model=f4,
             props=['throat.total_volume', 'throat.lens_volume'])
#检查一下
print("Volumes of full throats:", pn['throat.total_volume'][:3])
print("Volumes of lenses:", pn['throat.lens_volume'][:3])
print("Actual throat volumes:", pn['throat.volume'][:3])
'''
Volumes of full throats: [2.27203214e-14 2.58686910e-14 2.44028684e-14]
Volumes of lenses: [6.92245838e-15 8.40091924e-15 7.59556144e-15]
Actual throat volumes: [1.57978631e-14 1.74677718e-14 1.68073070e-14]
'''
使用预定义的模型集合
在 OpenPNM V3 中,我们引入了模型集合的概念 openpnm.models.collections,模型集合是形成完整且正确的几何形状的模型的预定义字典。例如,有一个名为 modelsspheres_and_cylinders 的集合,其中包含描述此几何图形所需的所有模型:
pn = op.network.Cubic(shape=[20, 20, 20], spacing=5e-5)
#The models collection is fetched as follows:

from pprint import pprint
mods = op.models.collections.geometry.spheres_and_cylinders
pprint(mods)
'''
{'pore.diameter': {'model': ,
                   'props': ['pore.max_size', 'pore.seed']},
 'pore.max_size': {'iters': 10,
                   'model': },
 'pore.seed': {'element': 'pore',
               'model': ,
               'num_range': [0.2, 0.7],
               'seed': None},
 'pore.volume': {'model': ,
                 'pore_diameter': 'pore.diameter'},
 'throat.cross_sectional_area': {'model': ,
                                 'throat_diameter': 'throat.diameter'},
 'throat.diameter': {'factor': 0.5,
                     'model': ,
                     'prop': 'throat.max_size'},
 'throat.diffusive_size_factors': {'model': ,
                                   'pore_diameter': 'pore.diameter',
                                   'throat_diameter': 'throat.diameter'},
 'throat.hydraulic_size_factors': {'model': ,
                                   'pore_diameter': 'pore.diameter',
                                   'throat_diameter': 'throat.diameter'},
 'throat.length': {'model': ,
                   'pore_diameter': 'pore.diameter',
                   'throat_diameter': 'throat.diameter'},
 'throat.lens_volume': {'model': ,
                        'pore_diameter': 'pore.diameter',
                        'throat_diameter': 'throat.diameter'},
 'throat.max_size': {'mode': 'min',
                     'model': ,
                     'prop': 'pore.diameter'},
 'throat.total_volume': {'model': ,
                         'throat_diameter': 'throat.diameter',
                         'throat_length': 'throat.length'},
 'throat.volume': {'model': ,
                   'props': ['throat.total_volume', 'throat.lens_volume']
'''
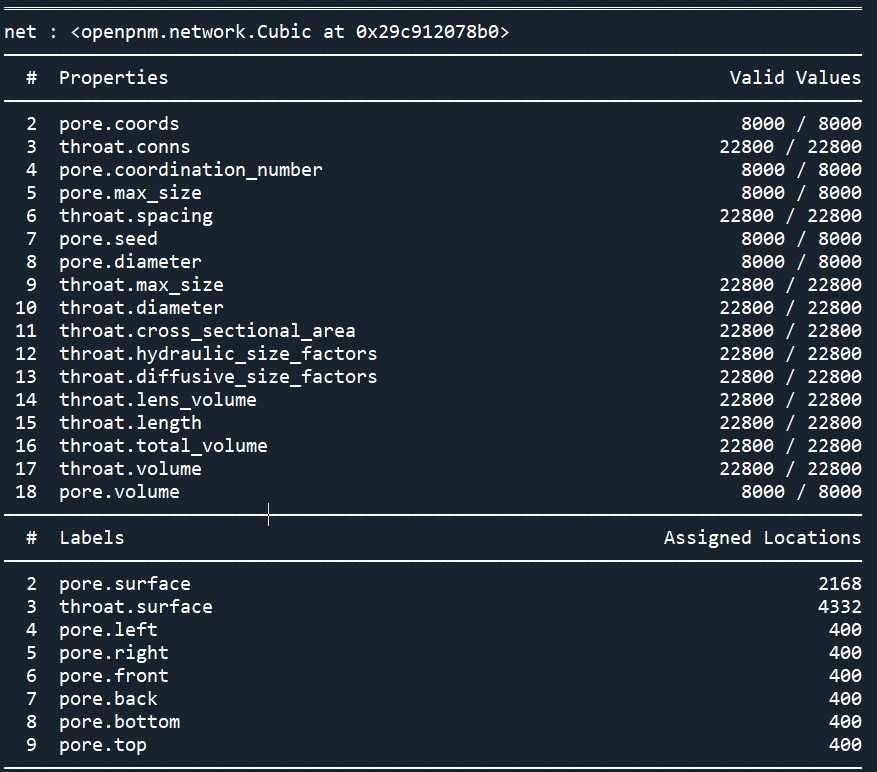
字典的打印输出不是很好,但可以看出键是模型名称,值是模型本身和模型的各种参数。可以使用 add_models_collection 将此字典添加到网络中,如下所示
pn.add_model_collection(mods)
pn.regenerate_models()
print(pn)
通过覆盖模型或其参数来自定义模型
OpenPNM 中包含的预先编写的模型和集合很有用,但通常需要调整某些模型以适应特定的应用程序。这可以通过更改现有模型的参数或将它们全部覆盖来完成。
让我们首先看看如何用我们选择的模型替换一个模型。该集合使用孔径的随机分布,以0和到最近孔的距离为边界。这可以通过打印具体的模型来检查,如下所示:
spheres_and_cylinders
print(pn.models['pore.diameter@all'])

用正态分布替换它:
f = op.models.geometry.pore_size.normal
pn.add_model(propname='pore.diameter',
             model=f,
             scale=1e-5,
             loc=2.5e-5,
             seeds='pore.seed')
print(pn.models['pore.diameter@all'])
plt.hist(pn['pore.diameter'], edgecolor='k')

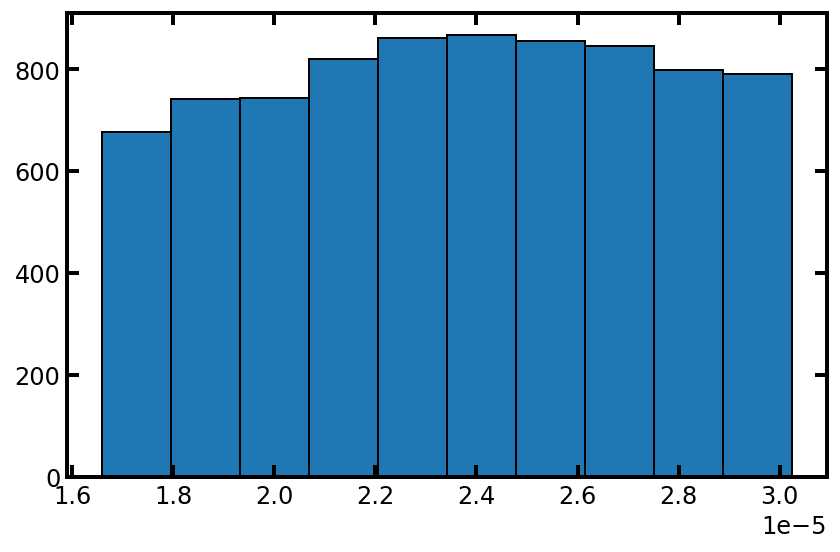
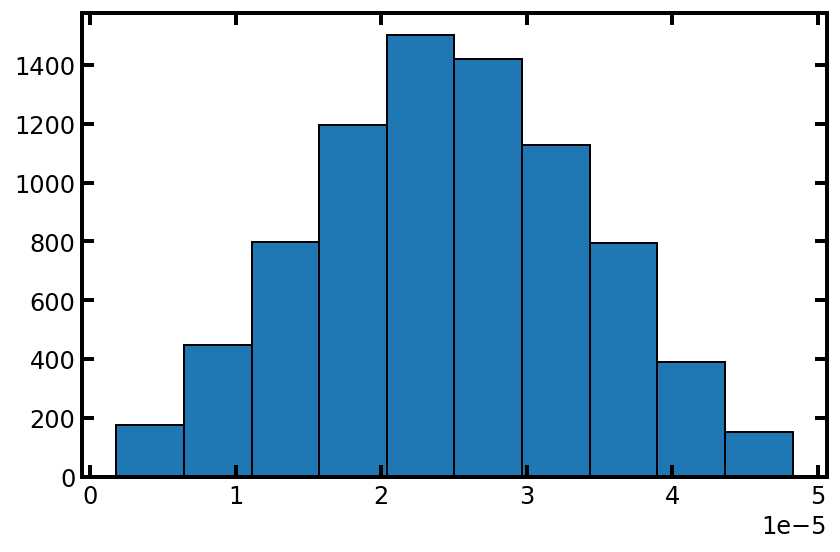
可以看到孔径分布并没有改成正态分布,这是因为pore.seed的值没有更改
print(pn.models['pore.seed@all'])
pn.models['pore.seed@all']['num_range'] = [0.01, 0.99]
pn.regenerate_models()
plt.hist(pn['pore.diameter'], edgecolor='k');

依赖项处理程序简介
孔隙尺度模型的主要优点是可以自动重新计算。例如,如果我们重新运行模型,那么依赖的所有其他模型也将自动重新计算
pn = op.network.Cubic(shape=[20, 20, 20], spacing=5e-5)
pn.add_model(propname='pore.seed',
             model=op.models.geometry.pore_seed.random)
pn.add_model(propname='pore.diameter',
             model=f,
             scale=1e-5,
             loc=2.5e-5,
             seeds='pore.seed')
pn.add_model(propname='throat.seed',
             model=op.models.geometry.throat_seed.from_neighbor_pores,
             prop='pore.seed')
pn.add_model(propname='throat.diameter',
             model=f,
             scale=1e-5,
             loc=2.5e-5,
             seeds='throat.seed')
print(pn['pore.seed'])
print(pn['throat.diameter'])
'''
[0.15319619 0.0328116  0.2287953  ... 0.23887453 0.8411705  0.10988224]
[6.59011212e-06 6.59011212e-06 1.75717988e-05 ... 1.13561876e-05
 2.66940036e-05 1.27284536e-05]
'''

pn.regenerate_models()
print(pn['pore.seed'])
print(pn['throat.diameter'])
'''
[0.36618201 0.35063831 0.40236746 ... 0.58822388 0.42461491 0.9016327 ]
[2.11640227e-05 2.11640227e-05 2.20171387e-05 ... 2.57748463e-05
 2.30989878e-05 3.79091080e-05]
'''
正如我们在上面看到的,调用前后的初始值都发生了变化。OpenPNM 通过检查每个函数的参数来自动执行此操作
下面的;流程图可以很好的解释依赖项处理程序的原理:
pn.models.dependency_map(style='planar');
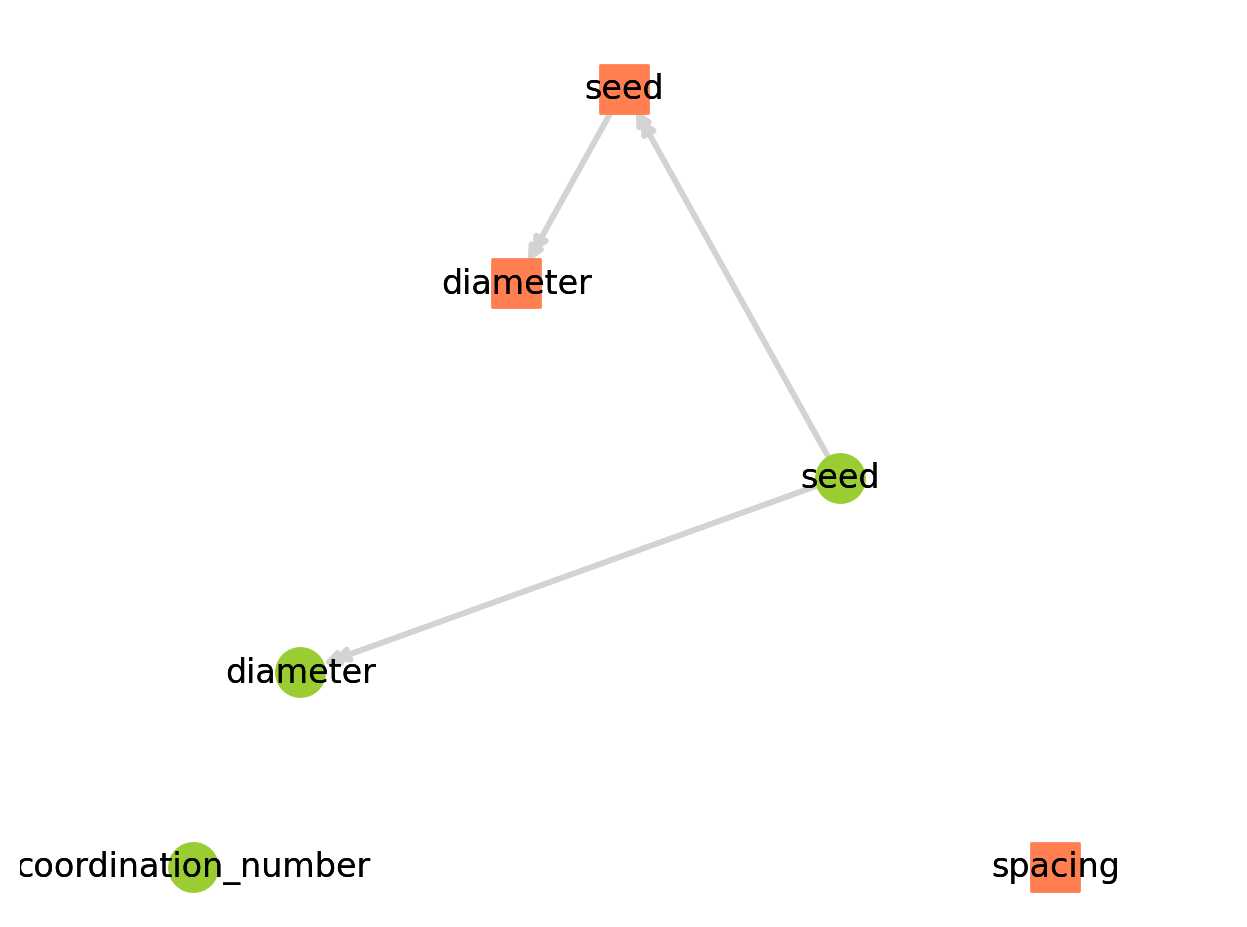
绿色圆圈是孔隙属性,橙色方块是流道属性。我们还可以看到,有两个模型不依赖于其他任何东西:coordination_number和spacing。这些在生成过程中添加到网络模型,但不运行,因此它们的值在执行时不显示。


Comments NOTHING